Menu Bar

Showing posts with label recipe. Show all posts

26.4.11

Green Tea Daifuku with Red Bean Filling

I heart Daifukus!
I love their chewy texture and the different types of fillings that they can come in.
Daifuku, meaning 'great luck' in Japanese, is a confection comprised of mochi (glutinous rice cake) stuffed with a sweet filling. I've always been hesitant to make daifuku as i was scared to stuff things up. The closest thing I've ever made was Tang yuan (glutinous rice balls) with sesame filling which only involves boiling and not steaming and handling hot mochi.

23.2.11

Green Tea Buttermilk Cake

I decided to make a buttermilk cake a few weeks ago (after being in a baking hiatus) as i had almost 3/4 of a carton of buttermilk left in the fridge. This time i decided to wing it just to see what i would get and also because i was too lazy to google for a nice buttermilk cake recipe. I added some green tea powder but unfortunately there wasn't much green tea flavour in the cake - will have to add more next time! The cake is fairly easy to make and to my delight it turned out soft, moist and deliciously rich in buttermilk taste. I can't recall the exact amounts but here are the rough estimates:

Green Tea Buttermilk Cake

-1 1/2 cup of self-raising flour, sifted
- 2 eggs
- 3/4 cup of buttermilk
- 125g of unsalted butter, room temperature
- 1 tsp of cream of tartar
- 1/2 cup of caster sugar
- 1/2 tsp vanilla essence
- pinch of salt
- green tea powder, as desired

1. Sift together self-raising flour, cream of tartar, salt and green tea powder together
2. Beat butter and sugar until you reach a creamy consistency, add in vanilla essence and mix.
3. Add eggs, one at a time, and beat well
4. Divide buttermilk and flour into three batches and beat into the butter mixture alternately. If the batter is rather dry, add a bit of buttermilk OR if the batter is too runny, add a bit of flour.
5. Pour the batter into a 9" loaf pan and bake in a pre-heated oven (~170 C) for 45 - 60 minutes. if the skewer that is inserted in the centre of the cake and comes out clean, the cake is cooked.
Enjoy~


16.2.11

Pineapple Tarts 凤梨酥 Recipe

Happy Chinese New Year everyone!
I love pineapple tarts, especially home made ones! Just to think about that lovely sweet and sour filling wrapped around by a melt-in-your-mouth pastry already makes me drool.
J and I have been wanting to make some pineapple tarts for quite a while and, after x months, we finally made it! Mission accomplished, in a way. Making pineapple tarts are certainly fun but at the same time, tiring and time consuming. Poor J had to cut up the pineapples and make the pineapple filling, which involved 1 - 1.5 hours of non-stop stirring. The sad thing? Two medium pineapples only yielded a minuscule amount of pineapple filling (fine, not that little...but you get the point). Making the dough was certainly less tiring and easier too. The most fun part was actually making the pineapple tart, i think i got a bit carried away and made a little chick (ate it before i could take a snapshot of it)
The finished product was very delicious and fragrant; all the effort put in was certainly worth it!

Pineapple Tarts Recipe (makes around 25)

Pineapple Filling:
- 2 pineapples, finely grated
- 4 tablespoon caster sugar

1. Slice and grate pineapple until fine. (If you have a food processor, use it!)
2. Strain the grated pineapple. (If you have a metal sift, that'd help!)
3. Let the pineapple simmer in a wok until dry
4. Add sugar and stir till the pineapple becomes thick, dry and sticky

Pineapple Tart Dough:
- 350g plain flour
- 1 tablespoon custard powder
- 250g butter
- 1 egg yolk
- 40g icing sugar
- pinch of salt

1. Sift flour, custard powder, salt and icing sugar together
2. Cut butter into cubes and add them to the flour mixture. Using your hands, mix the ingredients until you reach a crumbly consistency.
3. Add in yolk and keep working on the dough until you get a smooth and soft dough (make into a ball)
4. Rest the dough at room temperature for at least 30 minutes

Pineapple Tarts
1. Divide the pineapple filling into roughly 25 portions and roll them into balls
2. Do the same with the pineapple tart dough, each ball should weigh ~22g
3. Flatten the pineapple tart dough until it's enough to wrap the pineapple filling in it
4. Mould it into a rectangular shape and using a fork, draw lines on top of the rolls. Do the same with the rest of the dough and filling.
5. Put the pineapple tarts onto a baking paper-lined tray and brush them with beaten egg yolk. Bake for around 20 minutes or until golden brown. Cool before storing them in airtight containers.

Finished!
All you have to do now is to sit back and enjoy them. Share these lovely goodies with friends and families during this Chinese New Year Season! *putting them in nice containers make great gifts too! ENJOY~

27.11.10

Coxinha Recipe

It was one of those days where i suddenly had a craving for Brazilian snacks, particularly coxinha. It's one of those things that  eat during your childhood and that occasionally hits you out of nowhere, making you suddenly crave for them. As it is not readily available here in Canberra, my best option was to search for the recipe and make some. I always thought the the process of making coxinha was quite daunting, but in fact, it turned out quite easy - just time consuming! Coxinha, which literally means 'little thigh',is a popular Brazilian snack made from shredded chicken enclosed in a batter and fried. I used mozzarella cheese here because i couldn't get some catupiry (soft, mild-tasting cheese).  The name coxinha is given as the snack is roughly shaped like a chicken drumstick.
It was my first time making coxinha and i think they turned out quite nice - at least they tasted and looked like one. It's best eaten within the first few hours after deep-frying (with tomato sauce, if you like). Alternatively, you can freeze them and heat them up when you decide to have some (200C for around 15-20 minutes or until golden brown)!

Coxinha Recipe
Makes around 25

Ingredients

Dough
-1.7L of the stock used to cook the chicken breast
-1 cup of vegetable oil
-1 chicken stock cube
-1kg of plain flour

Filling
-1 large chicken breast, cooked and shredded
-1 large tomato, finely diced
-1 onion, finely diced
-1/2 cup of continental parsley, finely chopped
-1 chicken stock cube
-1 pack of shredded mozzarella cheese (optional) OR catupiry

Coating
-1 egg (+75ml of water)
-350g of breadcrumbs

Method
1) Dissolve 2 chicken stock cubes in 2.5L water. Add chicken breast and cook until it is done.
2) Shred the chicken breast and save 1.7L of the stock.
3) In a pan, add 2tbsp of vegetable oil and cook the onions. Add in the cube of chicken stock; add a bit of the liquid stock to help to dissolve the cube.
4) Add in the shredded chicken breast, tomato and parsley and cook for around 20 minutes. Leave the mixture to cool.
5) To make the dough, use a big pot and add in the saved stock, chicken stock cube and vegetable oil. Bring it to boil.
6) Once boiled, bring it down to low heat and add in the flour. Keep mixing until a dough-like mixture forms. The right consistency is reached once the dough no longer sticks to the bottom of the pot. Take the dough out and let it cool down (CAUTION: it is really HOT!) before kneading it until smooth.
7) To make the coxinha, get some dough and roll it into a ball. Flatten the ball and press the centre to form a little 'well'. Fill the bottom with a bit of mozzarella and then some chicken filling. Bring the edges together to seal and work on its shape until it resembles a 'little chicken drumstick' aka coxinha. (MAKE SURE BOTH CHICKEN FILLING AND THE DOUGH ARE COMPLETELY COOLED DOWN).
8) Dip the coxinha in the egg mixture (1 egg + water) and coat it with breadcrumbs.
9) Refrigerate the coxinhas for 30 minutes before deep frying them with vegetable oil. Enjoy!

29.10.10

A Floral 21st Birthday Cake

One of the major things that i was doing during the month of October was planning, designing, doing taste-trials for my friend's 21st birthday cake. Gladly, i wasn't doing all of these by myself; i had J to share the load and keep me company (since it was a shared project). The whole process was a fun and worthy experience, even though it took away some of our sleep time and energy. Despite being faced with some uncertainties and failures on the way, those 31 hours of hard work definitely paid off. The cake turned out very pretty (both of us couldn't stop saying '...so pretty, so pretty') and the birthday girl really liked it too.
I also decided to submit this blog post as part of The Nuffnang October Blogger Challenge because i thought that the cake & cupcakes were so pretty that i would totally take them to the Mad Hatter's Tea Party. The cupcakes have beautiful pastel colours and delicate flower decorations that especially suits a spring season tea party.
The journey started when we accepted the birthday girl's request to make her 21st birthday cake. At first, it sounded cool and fun but when we actually stopped to think about it we were like "Wait...it's her 21st birthday cake, not any other cake that we usually make". The birthday girl was going to hold a sit-down dinner for 50 or so guests, so we couldn't just make any Michel-Patisserie-like cake. It had to be displayed during the dinner, pretty, tasty and something that would feed 50+ guests. I immediately knew what we were dealing with...Fondant Cakes! Neither J or myself had ever made a fondant cake before, so we started to do heaps of research and watch Youtube videos about fondant cakes.
The birthday girl wanted green tea-flavoured cakes so we ended up making a White Chocolate Green Tea Mud Cake (main cake) and Green Tea cupcakes. We adapted the recipes from the book Planet Cake - A beginner's guide to decorating incredible cakes by Paris Cutler. We basically just added green tea powder to the recipes and reduced the amount of sugar needed in them. It's definitely a great book for beginners (like us) who are interested in cake decorating!
With everything ready and set to go, it took us 3 days to finish our little work of art! Let the journey begin...

Day One
We made the mud cake (as it can be stored longer) and coloured 6kgs of fondant to the colours needed: pale green and four shades of pink. That was a lot of muscle work involved! We were both pretty exhausted by the end of day...
Mud Cake Batter
The different coloured fondants
Day Two
That's when we made 6 batches of cupcakes (86 cupcakes in total), brushed them with syrup and covered all of them with white chocolate ganache.
Testing the batch of green tea cupcakes
Brushing the green tea cupcakes with syrup before ganaching them
Day Three
This day was entirely dedicated for decorating the mud cake and the cupcakes. We rolled out some pale green fondant and cut them into circles to cover the cupcakes. We also rolled out a massive 'sheet' of pale green fondant to cover the main cake and then, we put edible pale gold ribbon around the bottom rim of the mud cake. 
Cupcakes covered by pale green fondant
Covering the White Chocolate Green Tea Mudcake with Fondant. It wasn't as daunting as we thought afterall...
Covered mud cake with edible pale gold ribbon

We cut out a few hundreds of flower-shaped decorations to be used on cupcakes and the mud cake. All flowers were brushed with white shimmering glitter for a prettier finish and some flowers were decorated with metallic cachous.
Cutting flower-shaped decorations
More pretty flower decorations
In process of decorating the main cake
Finished cupcakes! I think it was past midnight when we finished all  them...

Day Three was probably the most fun and rewarding day for both of us as we got to see the final product! Yey!
It was such an accomplishment for us, i have to say. *tears...J also tears...

More photos of the finishing product...

Sorry for the long post, just felt like a proud mum!

9.10.10

Earl Grey Chiffon Cake

Sorry for being a tad slack about the posts here but October has been and will continue to be a busy month for me. Despite of all that i still managed to bake a Mini Earl Grey Chiffon Cake as part of my friend's birthday present. I've been wanting to make something with Earl Grey for a while and when i remembered that she mentioned about wanting to have Earl Grey Chiffon Cake, i decided to go ahead with it.
I tried looking for some Earl Grey powder but having failed to find any, i ended up settling for some Earl Grey Tea Leaves from T2 - they were so kind to provide me with some samples for Earl Grey and Earl Grey Royale. I used the latter one as it has a stronger flavour.
It was my first time making this cake and i think it turned out alright even though the Earl Grey flavour was quite subtle. It's best eaten on the same day because it loses a bit of that softness if left for a few days. It's a great treat for an afternoon snack as it's light and not too sweet =) Don't forget to have it with a cup of tea!

Mini Earl Grey Chiffon Cake

Ingredients

4 egg, separated100g caster sugar
50g unsalted butter, room temperature
50ml strong earl grey tea
30ml milk
¼ tsp salt
100g cake flour, sifted
½ tsp baking powder
⅛ tsp cream of tartar
2 tsp earl grey tea leaves

Method

1. Preheat oven to 170 degree C.
2. In a large mixing bowl, whisk together egg yolks, 20g of caster sugar, butter, earl grey tea, milk and salt until combined.
3. Sift together cake flour and baking powder, then add into (2) and mix well. Set aside for later use.
4. In another large mixing bowl, beat egg whites until soft peaks. Add in the remainder of the caster sugar and cream of tartar and continue to beat until stiff.
5. Take ¼ of the meringue and mix with (3) until well mixed. Gradually add in remaining meringue, and lastly stir in tea leaves. Stir until just combined.
6. Transfer batter into 2 mini chiffon pans and bake in the preheated oven for 35 minutes.
7. Invert the cake immediately after taking out from oven, and cool on rack completely before turning out from mould. Bon Appetit~

2.10.10

Okonomiyaki

After having a bad Okonomiyaki during the Nara Festival (a post about it coming soon!), i had the urge of making one myself. I've never made one before but i was convinced that as long as i didn't end up burning it, the results would better than the one i had at the festival. I looked up for some recipes online and found one that turned out quite well...i ended up making a Banana Prawn Okonomiyaki, Beef Okonomiyaki and Marinara Mix Okonomiyaki.
Out of all the Okonomiyakis that i made, my favorite one was the Banana Prawn Okonomiyaki. The beef one and the marinara one didn't have as much taste. So i do suggest that you season them before making your Okonomiyaki.
A small tip: adding slices of bacon does make the Okonomiyaki taste better.

Okonomiyaki Recipe
Ingredients
- 1 cup of Plain Flour (or Okonomiyaki Flour, if possible)
- 160ml of Water 
- 2 Eggs
- 4 cups of Cabbage, cut into strips
- 2 stalks of Green Onions, thinly sliced diagonally
- 3 strips of Bacon, cut into 6cm pieces

Optional
For Prawn Okonomiyaki:
- 10 Fresh Prawns cut into approx 1cm chunks

For Beef Okonomiyaki:
- 10 Thin Slices of Beef

For Marinara Okonomiyaki:
- 300g of Marinara mix, cut into small chunks

Toppings
- Kewpie Mayonnaise
- Okonomi Sauce (if you don't have the store bought one, you can simply make the sauce by mixing 3 tbsp of ketchup, 1 tbsp of Worcestershire sauce and 1 tsp of Soy Sauce together)
- Katsuobushi (Bonito Flakes)

Preparation:
1.In a large bowl, whisk together the plain flour and water until smooth
2. Add Eggs, Cabbage, Onions, Shrimp (Beef or Marinara mix) and mix, but don't over mix.
3. Oil a frying pan and add 3 pieces of bacon. Then, add Okonomiyaki mixture into the frying pan.
4. Using a spatula flatten and form pancakes until around 1.5cm thick and approximately 20cm
5. After about 3 minutes, flip over pancake and cook for another 4-5 minutes.
6. Flip pancake again and cook for another 3 minutes or until firm and well browned.

7. Remove the pancake into a plate and drizzle with Kewpie mayonnaise, okonomi sauce and sprinkle with some Katsuobushi. READY TO SERVE!

10.9.10

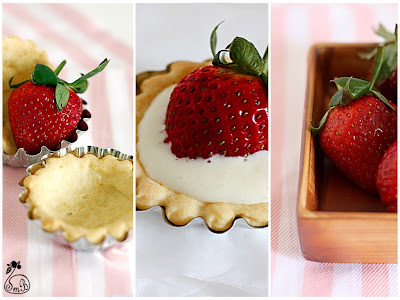
Strawberry Tartelettes

Sweet strawberries are one of my loves, but what if they are not sweet at all? That's what i found out when i brought them home.They were quite sour and even after i left them for a few days, they were only a tiny bit sweeter. Being in a good mood, I decided to make some Strawberry Tartelettes from scratch and make use of my small tart moulds that i bought from Provincial Home Living a while ago. It's a simple and easy Strawberry Tartelette recipe as i used whatever i could find in my pantry instead of going out and get some *too lazy and it was raining...

Strawberry Tartelettes (makes 12)
For the crust:
- 1 cup of plain flour
- 75g of cold unsalted butter, chopped

For the cream:
- 170ml of thickened cream
- caster sugar, to suit your taste
- few drops of rosewater essence

- a punnet of strawberries

Method
1) To make the crust, process the flour and the butter in the food processor until mixture resembles breadcrumbs. Add about 50ml of cold water and mix until the mixture comes together. Form a ball dough.
2) Divide the dough into 12 pieces and roll them out on a sheet of lightly floured baking paper until 3mm thick.
3) Line tart moulds with pastry, trim the edges and refrigerate for 20 minutes
4) Line tart shells with baking paper and fill with dried beans. Bake it for 15 minutes in a preheated oven to 180C. Remove paper with beans and bake for a further 10 minutes or until pastry is dry and golden. Cool tart shells.
5) To make the cream, simply beat the thickened cream with caster sugar (add bit by bit) and rosewater essence. I beat until i reached a mousse-liked consistency but if you prefer a whipped cream consistency, beat longer.
6) To serve, simply pour the cream into the tart shells and top it with strawberries. I used  whole strawberries for photo purposes, but i reckon that it will taste quite good with macerated strawberries too.
Voila!

26.6.10

No-bake Oreo Cheesecake

I realized that i can go pretty crazy with Oreos. Seriously.
I was doing my grocery shopping at Woolworths (as usual) when i spotted a basket full of Oreos packs near a supermarket pillar. I immediately knew that when you find a product in those baskets, it is either discounted or on special. For my delight, they were down to 99 cents and i did not hesitate to get 10 packs!
Apart from indulging myself with Oreo from that day onwards, i also decided to make a no-bake Oreo cheesecake since i had a block of cream cheese sitting in my fridge. I wanted a higher Oreo cheesecake but i was to lazy to get one more block of cream cheese from the supermarket...oh well.
This recipe is not hard and it doesn't require any sort of baking but my least favorite part was crushing a whole pack of Oreo biscuits with my rolling pin. It was quite tiring...

No-bake Oreo Cheesecake
Ingredients:
- 2 packs of Oreo
- 50g of melted butter
- 250g of Philadelphia Cream Cheese, room temperature
- 45ml milk
- 50g icing sugar
- 1 tbsp of vanilla extract
- 250ml of thickened cream
- 1 tbsp of gelatine powder
- 10ml lemon juice
- 3 tbsp of boiling water

Method

1. With the first pack of Oreo, remove the cream filling and set it aside. Crush all the Oreo biscuits with a rolling pin. Mix biscuit crumbs & melted butter together and press firmly onto the base of cake tin. Chill for 30 minutes. 
2. Beat whipping cream with electric beaters until mousse-like.
3. Double-boil gelatine, lemon juice & boiling water until totally dissolved. Keep warm.
4. Beat cream cheese, icing sugar, milk, Oreo cream filling (from step 1) and vanilla essence until smooth & creamy. Then, blend in the gelatine solution.
5. Add the whipping cream and blend well.
6. Pour 1/2 the cheese mixture onto the base. Chill for 15 minutes.
7. Sprinkle coarsely chopped cookies (8 Oreo biscuits) on top of the first half of cheese mixture.
8. Stir in finely chopped cookies (4 Oreo cookies) into the other 1/2 of the mixture. Mix well.
9. Pour in the second half of the cheese mixture.
10.Chill for 4 hours or overnight before serving.
Decorate as desired. I used some whipping cream and mini-Oreo biscuits to decorate my Oreo cheesecake. Enjoy!

The Oreo Cheesecake turned out quite nice and creamy, and i loved the base (i always like the biscuit cheesecake bases). I used a total of 2 packs of Oreos so there was plenty of Oreo taste all over the cheesecake! =)

19.6.10

Avocado cake with avocado cream

Avocado cake? Isn't that weird? - you may ask. I think most people here in Australia have the mentality that avocados are to be eaten as a savoury treat. However, where i grew up - Brazil - we consume avocados as a sweet treat such as in avocado ice-cream, avocado milkshake, avocado mousse, etc...In fact, i kinda found it a bit weird when Australians were having avocado as part of their salads, mains and sandwich spreads.
Since coming to Australia, i don't think i've ever made anything sweet with avocados except some avocado milkshake every now and then. With quite a few ripe avocados left in my pantry, i decided to make an avocado cake and some avocado cream to go with the cake. I had no idea of how it was going to turn out because avocados don't really have a strong and distinct flavour *i had my fingers crossed!
I just used the same recipe for making my Mini Banana Chiffon Cake but instead of bananas, i used 100g of mashed avocado. Since i wanted a flatter cake, i used my newly bought 20cm chiffon cake tin instead of the mini chiffon cake tin. I also made some avocado cream by simply beating some mashed avocado with some thickened cream and caster sugar.
As expected, the cake didn't have a strong avocado flavour but it turned out quite soft. Gladly, the avocado cream did enhance the overall taste of the cake. I ate it as my afternoon snack with a cup of green tea =)

28.5.10

Mini Banana Chiffon Cake

Another day with an impulse to bake a cake. Since i had some over ripe banana sitting in my pantry, i decided to use them. I didn't feel like making the traditional banana cake or banana bread and being still in love with my tiny chiffon cake mould after making the Mini Matcha Chiffon Cake, i decided to make a Mini Banana Chiffon Cake. I just love chiffon cakes, they are so soft and spongy! Perfect for an afternoon tea snack with some tea. I'm glad i found a recipe for a Banana Chiffon at Cosy Bake Blog.

I've made some minor changes to the recipe but you can still follow the original one. Here is my adapted version of the Banana Chiffon from Cosy Bake.

Mini Banana Chiffon Cake
Ingredients:
- 80g mashed banana
- 1 tbsp of milk
- 3 egg yolks
- 60g caster sugar
- 50ml unsalted butter, melted
- 80g cake flour
- 4 egg whites
- sliced bananas, optional

Method:
1. Mix the mashed banana with milk well 
2. Use a whisk, mix yolks and half of the caster sugar. Add in the butter and followed by the banana mixture. Mix well.
3. Sieve in flour to the batter and mix well.
4. In a large bowl, beat the egg whites and the rest of the caster sugar until it reaches the meringue stage. Fold in the meringue in 3 additions to the yolk batter.
5. Pour the batter into two mini chiffon cake moulds (~10cm) and bake for 30 minutes (or until set) at 180'c.
6. After the cake is baked, invert the cake mould and let it cool completely before unmoulding the cake.
Serve!

The cakes turned out really soft and spongy - just the way i wanted them to be. Although they didn't turn out quite pretty (with rather rough and wrinkled edges), there was still a lovely banana aroma coming from the cake that i just couldn't help but to devour it right after taking these photos!

14.5.10

Mini Macha Chiffon Cake

Having recently bought a chiffon cake tin from a Japanese shop, i finally decided to use it. I decided to make a macha chiffon cake because i was craving for it and also because here in Canberra, macha cakes are not as common as Sydney. Yes, macha cakes are a luxury here!

The recipe yields two mini macha chiffon cakes and they turned out spongy and soft; it wasn't as sweet as i would have liked it to be because i ran out of caster sugar (fail!). I covered the cakes with whipped cream, sifted some macha powder on top and decorated with some multi-coloured cachous pearls. The cake tastes the best without being refrigerated because once you put it in the fridge, it turns dense (as you can see from the photos). I had to refrigerate the second cake as it was covered with cream and i was too full to eat it after finishing the first one.

Mini Macha Chiffon Cake (yields two 10cm cakes)
Ingredients
-100ml of full cream milk
-1 1/2 tbsp of macha powder
- 75g of unsalted butter
- 90g of low protein plain flour, sifted
- 4 eggs, separated
- 100g of caster sugar (this should give you the right sweetness)
- 300ml of whipping cream
- 2 tbsp of caster sugar

Method:
1) Whisk macha powder and milk in a saucepan until well blended. Make sure you there are no macha clumps left in the mixture.
2) Add in butter and put the mixture over a stove. Stir until butter is melted and allow the mixture to cool.
3) Pour the macha mixture into a big bowl and beat in the flour and the egg yolk alternately (do this in 3 batches).
4) In a separate bowl, beat egg whites until foamy, add in caster sugar and beat until stiff peaks form.
5) Fold in 1/3 of the whites mixture into the macha mixture, mix well. Then, fold in the rest of the egg white mixture and mix well.
6) Pour mixture into two chiffon cake tins and bake in a preheated oven of 170C for 25 minutes or until set.
7) Remove the cakes from the oven and invert them immediately on a cake rack.
8) Whip the cream with caster sugar and cover the macha chiffon cake with it. (Remember to only cover the cake with whipping cream once the cake has been completely cooled down)
Ready to be served!

8.5.10

Gluten-Free Chocolate Cake

Decided to bake a cake out of impulse. I wanted to make something with my cooking chocolate (Lindt Piccoli) and i thought, why not try the gluten-free chocolate cake that i saw in my friend's mom's blog a few days ago? The recipe looked easy and fast which meant that i didn't have to wait hours and hours before i could eat a piece of the cake. It was my first time baking a chocolate cake without using flour as i've always been a bit skeptical on not using flour in cakes. Don't know why...
The cake turned out quite soft and spongy and it didn't taste overly sweet or rich. When left overnight, the cake wasn't as soft but it had a nice mousse-like texture. I quite enjoyed it because the next thing i realised was that a quarter of it was already gone on the night that i baked it! My only dislike: the cake was flatter than normal cakes that i've baked and it didn't last long!


Gluten-Free Chocolate Cake

Ingredients
- 150g of chocolate (i used Lindt Piccoli)
- 80g of unsalted butter
- 30g of caster sugar
- 3 eggs, separated
- icing sugar to dust, optional

Method
1) Preheat oven to 180C.
2) Melt butter and chocolate over simmering water. Allow it to cool.
3) Beat the egg whites (medium speed) and gradually add in the caster sugar. Beat until soft peaks form.
4) Add egg yolks into the melted chocolate and mix well.
5) Fold half of the egg white mixture into the chocolate mixture. Stir gently and make sure it's mixed well. Then pour this mixture into the remaining egg white mixture and fold gently. Mix well.
6) Pour the mixture into a greased 8" cake tin.
7) Bake for 25-30 minutes or until cooked. Leave it to cool and serve! Enjoy~

5.5.10

Crème caramel

This is the first time i've attempted a non-Brazilian Crème caramel - in portuguese we call it, Pudim de Leite condensado. The main difference is the usage of sweetened condensed milk in the Brazilian recipe whereas the one that i made, asked for cream. An evident difference is that the non-Brazilian Crème caramel one is not as sweet as the Brazilian one (i will call this Pudim de Leite, instead). The texture of Crème caramel was a bit rough and eggy as supposed to the smooth texture that i usually get making Pudim de Leite, but that could be my poor skills reflected in my first attempt of making the Crème caramel! We shall see...
Taste-wise was alright but i still think that a smoother texture would have made it better.


I took this recipe from an Australian Women's Weekly Book.

Ingredients
-165g caster sugar
-125ml water

-6 eggs
-1tsp of vanilla extract
-75g caster sugar, extra
-300ml (whipping) cream
-430ml of milk

Method
1)Preheat oven to 160C/140C fan forced.

2)Combine sugar and water in a medium frying pan, stir over heat, without boiling until the sugar dissolves. Bring it to the boil, uncovered and without stirring until the mixture is a deep caramel colour. Remove from heat and allow bubbles to subside. Pour toffee into 6 'panna cotta' moulds.

3)Whisk eggs, vanilla extract and extra sugar in a large bowl.

4)Combine cream and milk in a medium saucepan, bring it to boil. Whisking constantly, pour hot milk mixture into egg mixture. Scoop mixture into the moulds.

5) Place the moulds in a baking dish and fill up the baking dish with boiling water until it reaches about halfway of the moulds. Bake in oven for about 40minutes or until set. Remove the moulds from baking dish, cool them down and refrigerate for at least 3 hours.

6) Ease the crème caramel from the mould and invert onto a serving plate. Enjoy!

Let me know how you went if you attempted this recipe too =)


23.4.10

Simple Banoffee Tarts

It wasn't long ago since i made these little and simple Banoffee Tarts, to be precise i made them on the day we had a hot pot. I wasn't intending to make them at the start, but since i ended up with a whole can of awesome dulce de leche (milk caramel), i decided to make something for everyone to share. Since i had some bananas, ready-made shortcrust pastry and cream why not make some bite-sized Banoffee tarts? Simple and easy but making the Dulce de Leche can be time consuming. Here's how:

First of all, you'll need 1 can of sweetened condensed milk; remove all the labels to minimize the messiness. Submerge a can of sweetened condensed milk into a pot of cold water (make sure that the whole can is covered with water). Place the lid on the pot and turn the fire on. Once the water starts boiling, turn the heat down to a simmer and leave it simmering for about 3 hours (IMPORTANT: Please check it often to make sure that the can is still submerged in water). I used a tea towel to take the can out of the pot after i've poured all the water content down the sink. Cool down the can of dulce de leche before opening them - i left mine in the sink after rinsing with cold water. Ta-da...done! Tip: they are good on toast! 

If you rather enjoy the dulce the leche by itself you can stop reading, but if you want the rest of the Banoffee tarts recipe, read on:

1. Using a cookie cutter (3.8cm), make little tart shells with the shortcrust pastry.
2. Whip about 250ml of thickened cream in a chilled bowl until soft peaks form. Add in 2 tbsp of caster sugar and 1tsp of vanilla extract to the cream. Whip until firm peaks form - if it starts to look grainy, you have most likely over-whipped your cream.
3. Cut the banana into 5mm slices

Assembling the Simple Banoffee Tart:
1. Put 1 tsp of dulce de leche in the tart shell
2. Put 1 or 2 slices of banana on top of the dulce de leche
3. Using a 2.5cm in diameter star noozle, pipe out some whipped cream on top of the bananas
4. Add some crushed peanuts on top of the cream and...Voila! *Oops,i took the photos before completing step 4.


Related Posts with Thumbnails